Showing posts with label corner blog elsewhere. Show all posts

4.09.2014

me + williams-sonoma


A few weeks ago I was contacted by a writer from Williams-Sonoma Taste to do a little feature on me, my donuts, and some of my ideas on entertaining and the like. I was more than happy to oblige. Thrilled, actually!

This was my first real interview, and I enjoyed answering the questions. It helped me sharpen my ideas on what I'm doing with the donuts, where they are going, and where I am going. I talk a bit about how "corner blog" came to be, how the donuts started and other fun stuff. It also reminded me that even though I am a paper-cutting robot right now, I used to entertain and cook like a regular person, something I am so looking forward to getting back to!

If you'd like to check out the interview, you can find it HERE. And if I don't make it back here until next week, have a great weekend! 

xoxo


12.02.2013

holiday class schedule


Hi there! I hope you had a great Thanksgiving. We took a lovely little 1,300 mile road trip to see family, proving again that we have the most incredible children in the world when it comes to patience and bladder control. 

We returned home from our trip yesterday and I went right out and grabbed a copy of the San Francisco Chronicle. The Home and Garden section this weekend was themed "Handmade for the Holidays", and I was included in a full-page spread inside entitled "Holiday Classes: 8 Ways to Explore Your Crafty Side". What a thrill to see my name (and papel SF) in the Home and Garden section, along with a photo I had provided of my acorns, and to be in such great company (both friends and women I hope to meet were featured along side of me). I'm sure my mother is wondering why she paid for five years of architecture school at this point. 

Here is the schedule for and links to my three December classes around the Bay Area, in case you didn't read the paper. I would love to have you join if you can. We will make some of my acorns and get started on some pine cones, have a beer or two, do some networking, and you'll walk away with a homemade holiday gift or two. This is a modern day stitch-and-bitch as far as I'm concerned, and you will definitely have some fun!


WOODLAND EGG ORNAMENT WORKSHOPS WITH PAPEL SF
Makeshift Society (San Francisco)
Thursday, December 5, 2013
6:30-8:30 p.m.
Register here for this class

Handcraft Studio School (Emeryville)
Thursday, December 12, 2013
7:00-9:00 p.m.
Register here for this class

Workshop (San Francisco)
Monday, December 1, 2013
7:30-9:30 p.m.
Register here for this class


I am really excited about these classes, but I think this should be the last time I mention these freaking acorns here! Thank you for letting me be a broken record over the last few months with all of this jazz, it's been a fun little ride. I hope to see you in class! Happy Monday!


9.21.2012

well, how did i get here?


I have been shouting this from virtual mountaintops, but in case you didn't hear me hollering, our 101 Donut Pan Ideas project was featured in the Martha Stewart Living blog Wednesday morning! HERE is the link. What a thrill! I can only hope it passed over Martha's desk at some point. Wouldn't that be cool? Then maybe she'd discover my piñata eggs, because those would look SO great in the Easter-themed April issue of her magazine! 

Anyhoo, I feel really honored and have been getting a lot of support from friends and peers, and some people I don't know that well but admire, and from the San Francisco Etsy team. Super nice stuff.

I seriously don't know how I got here. I do, in that I used a Martha Stewart recipe that linked back to her blog, and someone at Martha Stewart Living saw that and followed me back here. But I don't, in that how did I work in architecture for 20+ years and end up wanting to make donuts? I know, I talk about this kind of stuff ad nauseum lately. Back in school, we used to talk about David Byrne and the rest of the Talking Heads meeting in architecture school and then bailing to pursue music. Turns out that story is not completely accurate, but I remember thinking that what they had learned in school had probably shaped what they went on to do musically. All I know is for now I'm happy to not be designing waterproofing details, although that is a forté of mine. 

Have a wonderful weekend! We're going out with good friends for an awesome meal and a show I've been looking forward to for a long time, so I'm pretty excited. Oh, and I'm the stage kitten tonight for Red Hots Burlesque, where I'm going to be picking up the cast-off delicates of The World Famous *BOB*. Holy wow! Wish me luck!


4.02.2012

easter egg piñatas


I was recently inspired to blow out eggs to decorate for Easter this year, because I've been sitting on this fun idea that required them for months. Easter egg piñatas! I saw some beautiful ruffled crepe paper lanterns here in January, and I couldn't wait to try this technique on eggs. I've been really excited about them, and they came out exactly as I had imagined. I don't care that everyone else in this household asked me "what ARE those?" while I was working on them yesterday. I think they are beautiful!

I stuffed some of these with dollar bills and confetti, and those are truly piñatas. If you plan on smashing yours, make sure you put something good in them. You don't really want your eggs smashed to smithereens for just a little confetti, do you? Come on now. 


These are the first two I finished. Are they not SO PRECIOUS? Is it just me?

Here I used a dyed egg and gave it a little spring sky skirt. My manicure took a beating doing all of this. Look at next photo. That's this egg turned upside down, but it's also a dead ringer for a ranunculus! What a great idea for these. Stick them upside down on skewers and make a bouquet! 


Here's what Stella did with her blown out eggs. Pretty clever use of my leftover rhinestone stash.


Speaking of that rhinestone stash, I'm working on a special Easter egg for one sparkly lady I know!


So there you have it! Aren't they wonderful? I want to tell you a little something. Working on a blog has changed the way I think, and has started to shift my thought process to something much more proactive than it used to be. I've always been a little inspired, but I used to wait for it to find me. Now I'm looking ahead, looking for new ways of thinking and looking at things. We did a lot of that in architecture school. A lot of times I'll come up with something, only to find out it's been done before (see paint chip valentines), but it's a special feeling when you hit on something you yourself have never thought of before. Good times!

Note: These were featured at Design Mom on April 4, 2012.


2.27.2012

apartment therapy awards


Note: "The Homies 2012" are over and voting is closed. I landed somewhere around 20th place,
and that's good enough for me, this year anyway! Thank you to all who voted for me!


Apartment Therapy has been very good to me over the last six months. The exposure I've gotten from being featured there (five times!) has been really fun and exciting, and I'd love to be included in the "Best Family Blog" list, part of their "The Homies 2012" awards. I would be thrilled if you'd be willing to cast a vote for this blog over there right now. The voting ends Friday, March 2nd, and I'd be grateful if you wouldn't mind giving it a try. 

Here's what you do:

1. Click HERE.

2. Scroll down (or up!) until you see "corner blog" and cast your vote. It is possible you may have to register to do this. Apartment Therapy is a very legit blog and registration is easy, so don't worry. Please only vote once for me.

Thank you so much. I've got a lot more I want to show and share in the coming months. I love being included with other design-minded folk, and I'd be in good company on this list. Thanks again!

xoxo,
Tiffanie


2.17.2012

hat trick


This week has been pretty exciting for me. It was one of those weeks where "putting it out there" has really paid off. I submit projects I do and interesting blog posts I write from time to time, here and there, to different places online, hoping to get more exposure for things I've done that I'm proud of. This week, "corner blog" content was published at two other blogs, and an article about Stella and her street style was published at a third. That's a hat trick!


Here's the scoop:


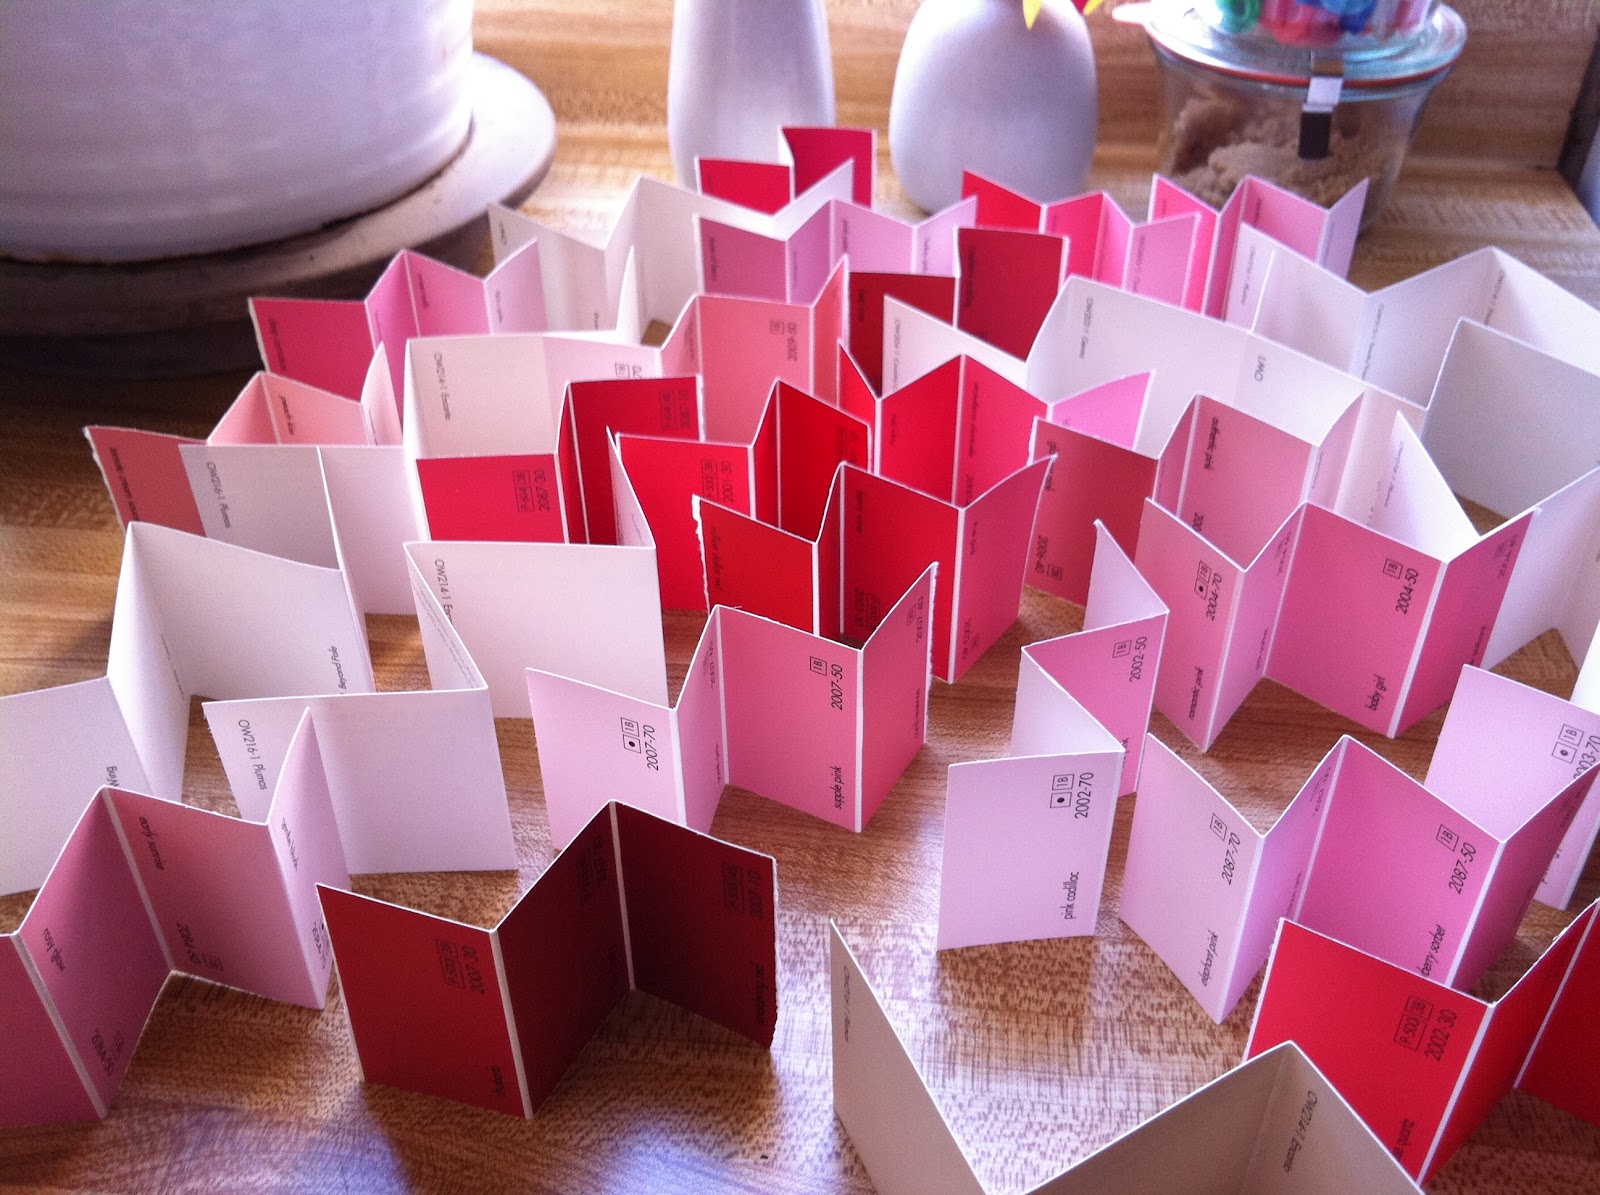
This past weekend I made THESE really cute valentines out of paint sample chip strips. I've been shouting it from the mountaintops, so you might have been under a rock if you didn't hear about them yet. Turns out I didn't invent these things (I thought I had), but I sent the post to Benjamin Moore Paints, and on Monday they let me know that they would be part of a Valentine's Day post on their color blog called Color Chats. You can see their post about paint chip valentines HERE!


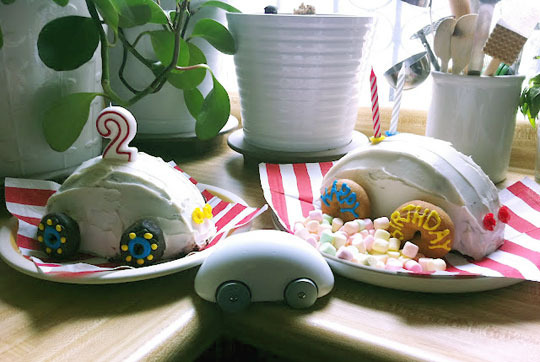
The same day I heard from the editor at Apartment Therapy Family who said they would be featuring photos and a blurb about Oliver's second birthday party and birthday cake as part of their "Best Kids Parties" series, also on Valentine's Day. Last year, the same blog featured a tour of Stella's room, our homemade dollhouse, and our art walls, so I was really excited to hear from them again. I had submitted SIX different ideas to Apartment Therapy about two weeks beforehand, so I was happy they bit on at least one! You can see the A.T. piece HERE. (Oh, and the day after Valentine's Day, it was picked up on the cooking branch of Apartment Therapy, called The Kitchn, see HERE. Bonus!)


(image via Modern Kiddo)


And then yesterday Stella was featured as the "Weekly Kiddo" at Modern Kiddo, a wonderful, wonderful blog written by Miss Dottie and Alix, who specialize in writing about all the wonderful vintage things you used to love as a child, as well as all the wonderful vintage things you appreciate more because you are an adult! Click HERE to see this amazing layout with so many wonderful shots of Stella, and a fun, playful article about her, too! Thank you so much to the ladies at Modern Kiddo, and to Miss Dottie for such a sweet, sweet article.


It's been really rewarding to have all of this come together at the same time this week. And curiously, it leaves me wanting more. Not more publicity necessarily, but rather to raise the bar on what I write about, the photography I share (when will I buy a real camera?) and the reasons I blog at all. It's interesting (to me) that this is where I'm at today. It's a good reset for me, when my ego can sit still for a minute to rest on its laurels, while my intellect moves forward. Do you know what I mean?


I recently found this quote that was floating all over Facebook. It's by Ira Glass. I read it every day. It's another great inspiration to keep doing what you do (even if it is just baking cakes and making valentines!):


“Nobody tells this to people who are beginners, I wish someone told me. All of us who do creative work, we get into it because we have good taste. But there is this gap. For the first couple years you make stuff, it’s just not that good. It’s trying to be good, it has potential, but it’s not. But your taste, the thing that got you into the game, is still killer. And your taste is why your work disappoints you. A lot of people never get past this phase, they quit. Most people I know who do interesting, creative work went through years of this. We know our work doesn’t have this special thing that we want it to have. We all go through this. And if you are just starting out or you are still in this phase, you gotta know its normal and the most important thing you can do is do a lot of work. Put yourself on a deadline so that every week you will finish one story. It is only by going through a volume of work that you will close that gap, and your work will be as good as your ambitions. And I took longer to figure out how to do this than anyone I’ve ever met. It’s gonna take awhile. It’s normal to take awhile. You’ve just gotta fight your way through." -Ira Glass


2.10.2012

paint chip valentines


Note: Our Valentine's were featured at Benjamin Moore's color chats! blog on February 14, 2012!


A few years ago, being an architect and all, I ordered a few paint sample fans from the paint company Benjamin Moore. They sent a case of them by accident. After several failed attempts to return them, they ended up scattered around San Francisco, to other architects, to clients, to whoever would take one!


But there are a few fans still lurking around here, and on top of that, we live a few doors down from a Kelly-Moore paint store. A couple of days ago an idea just came to me out of the blue: paint chip valentines! So many resources for the materials, so easy! Last year's heart-shaped-construction-paper-loaded-pizza classroom valentines took FOREVER, so this year I took it upon myself to simplify, heavily.


Here's what I did.


I took individual sample strips and strips I tore out of the fans, shortened them into three or four-chip-long segments, and folded accordion style. Be sure that there is a front of a chip facing out on at least one side. Four-chip-long ones are better, because the "To:" label will be facing outward when these are done.


By the way, I think I might take a rubber stamp to some of these chips or strips with my "corner blog" logo and contact information on them and make myself some cute business cards. I'll let you know if I do!


Then I added the "To:" and "From:" labels, for Stella to fill in when she's home from her first ever sleep-over tomorrow. It is hard to describe in words why I did this like I did this, but basically I want Stella to be able to see who the valentine is addressed to when handing them out in class, so the "To:" goes facing out at one side (these will be closed up before they are delivered). Do you follow?


If I wasn't trying to get this off my plate for the weekend, I'm sure I would've found a cuter way to letter these, by the way!


Next I used a little eraser stamp trick I've seen lately here and here. The difference is, I have a GIANT eraser (and now owe Stella a new giant pencil).


Did you notice the orientation of the heart on the end of the strip? Maybe go back and look again, if you're thinking about doing this yourself. It's easier just to show you than to explain!


The white valentines with the red hearts are my favorites.


When they dry, and after Stella has addressed each one and signed her name, I'm going to fold them together and tie them gently with a piece of mauve or pink string, or maybe some bakery string, if I can get some this weekend. If you end up with some that are only three segments long, you should write the addressee's name in pencil on the blank back of the valentine, so you know who it is going to (the actual "To:" will be folded in, so you can't see it).


With these out of the way for the year, happy weekend to me!


11.23.2011

stella's room at apartment therapy today!


I've been waiting for this for several weeks, and am excited to say that Stella's bedroom is being featured at Apartment Therapy today!

Click HERE to read the article!

It was interesting being interviewed for the article, and realizing how little of my formal architectural training informs what I do in my own home anymore. Also answering the question of what I would do  if money were no object. If money were no object, we'd be living on a farm high on the hills of Point Reyes Station overlooking Tomales Bay. But it was really fun and the writer, Richard Popovic has his own Daddy blog called "All Dad, All Day" over here, so check him out!


11.07.2011

her room


Note: Stella's bedroom tour was featured at Apartment Therapy on November 23, 2011!


We are big time co-sleepers. We co-slept with Stella until she was 31 months old, when she had finally weaned herself. She stayed in our bedroom another two years, a mere eight feet away from where she slept before. Her brother is following in her footsteps, maybe looking to break some records.

When Stella finally moved out of our space, conditions had changed so that David no longer required a full home recording studio and office, and we were able to condense his workspace into a fourth of what it had been, freeing up the other three quarters of that second bedroom for Stella. 

My main objective was to give Stella a room all her own, but still allow space for David to work occasionally without keeping her up at night. I also was really excited about finding a new place for my her giant collection of kitchen play items that had been hanging out in our living room for years. And I wanted her to have some great places to read.

Before:

During the work:

After:

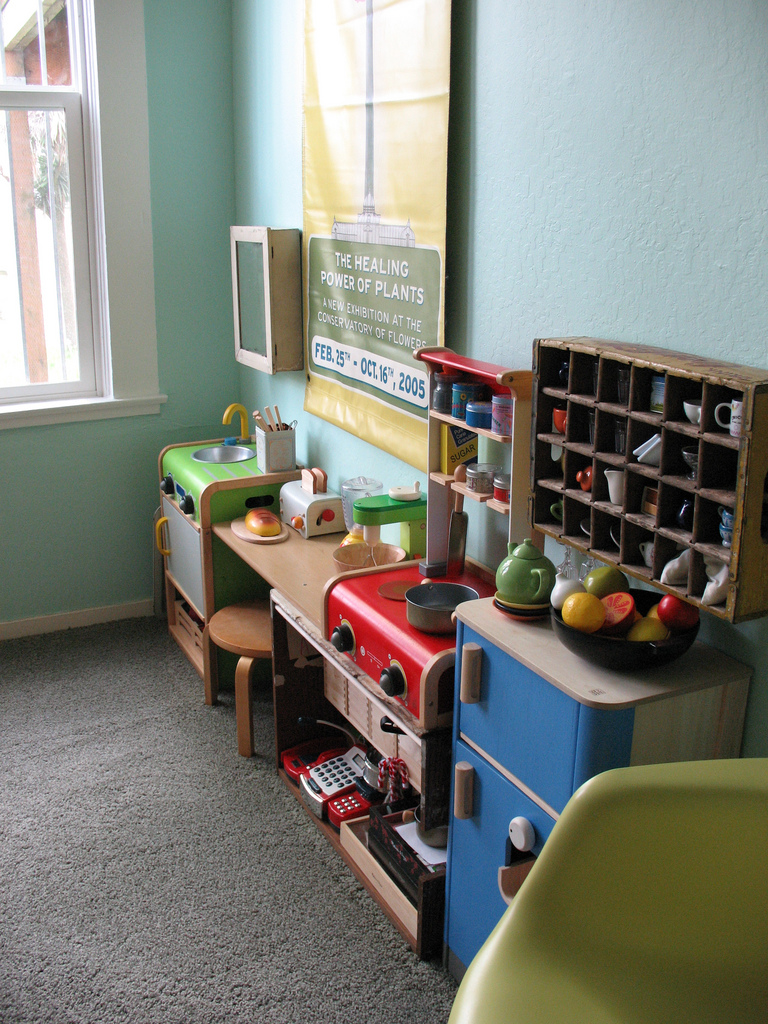
"Custom" kitchen with vintage Coke crate storage. I was happy there was room to make actual counter space, which I made from a keyboard tray from David's old desk.

 Under part of the counter and stove is an old crate, turned on its side. I hung a pretty curtain in front of it, and inside mounted a small Ikea kitchen drawer unit for napkins, spices, utencils, etc.

 Aforementioned napkins, spices, utencils.


I have a new idea I think you're going to love. Fake food food blog. Don't steal my idea.

 The view from below Stella's bed.

Depression era dresser (drawers are actually made from repurposed fruit crate slats). Bookends made from cedar beam detail mock-ups from an old project in Sausalito. Two fish who have been living a lot longer than expected. Piñata head "taxidermy" wall ornament. I totally thought I was the first person to think of this, but it turns out I wasn't.


 A banner from the Conservatory of Flowers exhibit running at the time of Stella's birth, the view from her window.

Vintage wooden crate divider/bookcase to separate David's desk from Stella's bed. It blocks light from David's side if we're in there while she's sleeping, but still lets some sunlight over during the day. We live in earthquake country, and you can be assured it is secured in all sorts of ways you can't see here, and also not secured in other ways it shouldn't be. Mommy is an architect and she knows what she's doing.

Here are the crates from Stella's side. We flipped one toward her so she could have a cubby for knick-knacks and photos and whatnot. We took the terrible mirrored sliding closet doors off and stowed them, replacing them with that cool birch tree tapestry on some face mounted sliding hardware. I love birch trees.

Under-bed reading area. It's possible I cleaned the room TOO much before I took these photos. It looks a little static here. Right now there's a mound of pillows and sleeping bags there and it's really cozy. One day that'll be where Oliver sleeps. I hope.

Not much longer before shorty is too tall to stand underneath without bumping his head!

The tree was taken from the garden at Stella's then-preschool. It literally walked past me and out the door of the school the day I decided I needed a tree for her ceiling. The birds are something I had gotten at Ikea years ago but never knew quite what to do with them. I was so glad I still had them.

A fuzzy photo of the divide between David and Stella's spaces. We painted David's side many shades darker to help delineate the space a little more, and to macho it up.

Jars for stuff. One of them sweats every day.


I think we did really well as far as squeezing a lot of space and a lot of function out of one room. We love playing in there, although because of the play kitchen, things get really messy really quickly. Add a play date and the dress up bag and the Playmobil, and you've got a room that takes sometimes an hour to straighten. One thing I've felt pretty strongly about is not having a catchall toy box for everything, but that might be a big mistake. I just love going into Stella's kitchen to play Iron Chef with her and having everything we need right there. A catchall toy box might complicate something like that, but it sure would shave some time off the cleaning. Up for discussion.


It really doesn't matter though. Once Oliver gets in there, it's game-over.

Before Oliver:

During:

After:


Related Posts Plugin for WordPress, Blogger...