9.30.2012

biscotti donuts


Donuts are made for dunking, and so are biscotti, and so here you go. A hybrid: biscotti donuts. Inspired!


Here I've adapted this spumoni (cherry, pistachio and chocolate) biscotti recipe I've been using during the holidays for years. I think any biscotti recipe would work here, but I like this one for the textures and the flavors, and the memories. My mother used to keep spumoni ice cream in the freezer, and I loved it, a lot.

The recipe makes a dozen biscotti donuts. You'll need 2 1/2 c. flour, 1 1/2 tsp. baking powder, 1/4 tsp. salt, 1/2 c. softened butter, 1 c. sugar, two eggs, 1/2 tsp. almond extract, 1/2 tsp. vanilla extract, 1 c. shelled pistachios, 1 c. maraschino cherries, and 6 to 8 oz. melted semi-sweet chocolate, if you want to drizzle or coat the biscotti with it. You'll also need baking spray (or oil/butter and flour) and a large plastic food storage bag to use as a pastry bag to pipe the dough into the pans. A regular pastry bag doesn't have a big enough opening at the tip to handle this dough.


Start by preheating your oven to 325º. While the oven is heating, coarsely chop your pistachios and cut each cherry into quarters. Prep your pans by spraying with baking spray or oiling and flouring.


In a small bowl, combine flour, baking powder and salt. In a medium bowl, cream the butter and sugar together until fluffy, then beat in eggs one at a time. Add the extracts, then stir in the flour mixture a little at a time. This dough is a really sticky one, by the way!


Stir in nuts and cherries, then spoon dough into a plastic bag, twisting the top of the bag so no dough can escape. Cut one of the bottom corners of the bag to use as a tip around 3/4" wide, and pipe dough into pans. Move slowly and squeeze firmly, allowing the dough to fill out the depth and width of the pan as you go. If you pipe it too quickly, your biscotti may end up too thin, and more cookie than donut-like.


Put them in your 325º for 35-30 minutes until edges and bottoms start to brown. Keep a really close eye on them, as you don't want the too dark. Remove from the oven. When cool enough to handle, remove the biscotti donuts from the pans and place on a cooling rack set over a baking pan. Reduce the oven temperature to 250º and bake the donuts again on the cooling racks for 15-20 minutes more until they are golden and feel dry. Remove from oven and cool completely.

Note: Because of the cherries, there is some leftover moisture in the biscotti that might not normally be there. If you want them really dry, push that second lower temperature cook to 20-25 minutes (but don't over-brown them) and then turn the oven off, crack the door a few inches, and let them cool completely inside the (turned off) oven. I found this suggestion by searching around online, and it worked pretty well.


Aren't they amazing looking?


Guess what, they're amazing tasting, too, and they are nice and dry and stand up to a cup of coffee just like they should.


Of course, for the full spumoni taste we need the chocolate. Melt semi-sweet chocolate in a double boiler or bowl set over a pan of boiling water and dip donut edges into the chocolate, or drizzle the melted chocolate over the donuts. Either way they'll be delicious. Set donuts on wax paper to dry.


Chocolate dipped or not, these are wonderful treats to have around. They are filling, so we didn't plow through them today as quickly as we have with some of our other donut pan projects. We still have some left for breakfast tomorrow, although people have been trying to get their hands on more of them all afternoon.

These probably would keep for a week or two in the freezer, to help keep them on the dry side. I am thinking I will send them to some of our East Coast friends and relatives this year, with instructions to dry them out one final time in the oven once they receive them. I have a feeling I'm going to be shipping a whole lot of donuts come December!


9.27.2012

showtime: red hots burlesque, el rio, september 21, 2012


All photos by Johnny Crash Photography.

As I've mentioned before, last Friday was my first time on stage at El Rio in San Francisco with Red Hots Burlesque, run by the lovely Miss Dottie Lux. I was merely a stage kitten, running around gathering cast off boas and bras, trench coats and oversized, purple-glitter-covered fire hydrants. I was more nervous than usual until I got in the door, then I was just fine. Actually I was more than fine, I was giddy. I was the star-struckiest, goofiest lady there! I met The World Famous *BOB* backstage and spoke with her for a bit. She is a sweet, sweet woman who does so much positive body image work, both on stage and off. It was an honor to pick up her heels after her act. Her act was so much VAVAVOOM! I love acts that really dance and move like hers did. She was incredible! Here she is on the left of this photo taken after the show.

Back row: The World Famous *BOB*, Alotta Boutte, Pickles Kintaro, Dottie Lux, me (Yve Jobs!)
Front row: Lucky audience member, Honey Lebang
Floor: Pearl E. Gates

I loved all of the performances! I had never seen Honey Lebang perform before, but she was terrific. It's was a nice little show that threw a huge punch. Dottie calls her world of burlesque the Pink Bubble. Yay for the Pink Bubble!

It's been too long, three months to be exact, since my last showtime post. Boo! I'm getting really excited for my October shows. I listen to the track I'm performing to (this one) five or six times a day as I race up the Panhandle to pick Stella up every afternoon. With each listen, I figure out how to tweak something here or there so it will be even better than the last time I performed it. That process can start out so frustrating, but if you go over and over it in your mind, eventually the act can take a turn you didn't even know was coming. I'm so into it!

I'm also thrilled to have a new place to perform. I just can't wait. I've absolutely LOVED performing with Bombshell Betty for the last two years and I jump at any chance to fit one of my acts into her shows, but it's also great to have somewhere to show my old stuff where no one's seen it before. Yay for me!

Have a great weekend everyone. I'll be back with more donuts and kiddos next week. This weekend Stella and I have a ladies' date to see a play and I really can't wait.

xoxo,
Tiffanie (AKA Yve Jobs)


9.26.2012

how to make crepe paper flowers (my way!)


I started to notice this beautiful Italian crepe paper from Carte Fini over the last year popping up here and there, twice at ohmyhandmade in the spring (see here and here), and then recently at an ohhappyday/anthropologie event here in San Francisco. I finally ordered seven rolls a week or two ago and they are in my hot little hands now. I was so excited to dive into my piñata designs using all these new colors, but the paper is so stiff that it is harder to glue and cut, and the piñatas lose the traditional softness found with simple crepe paper streamers. Case in point, my "candy corn" egg piñata. The egg on the left is made with Carte Fini paper. The egg on the right is made of regular old streamers.


I ADORE the ombre orange-yellow-orange paper. I love the ombre blue-silver-blue. The salmon pink color I have is luscious. Unfortunately, the paper itself is not very suited to my uses. Here's my full stash, by the way. SO vibrant.


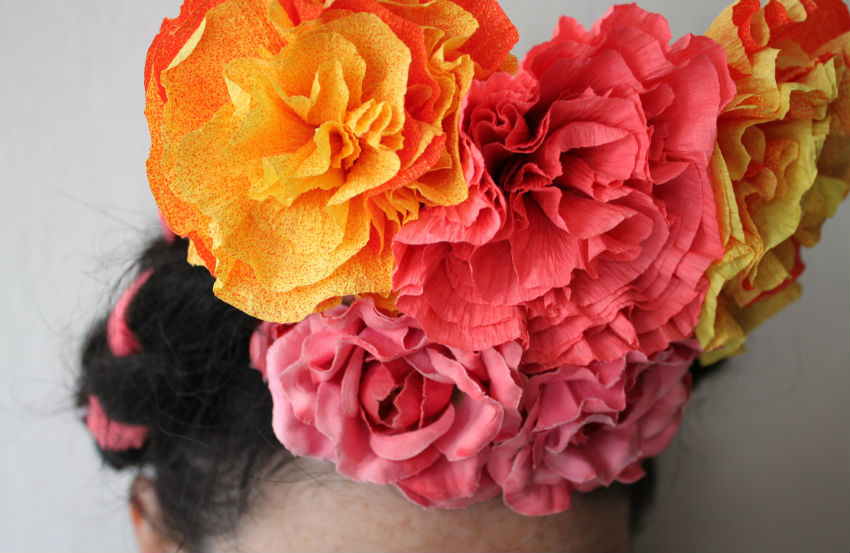
It just so happens, though, that my Frida Kahlo costume for my October performances needed an upgrade (see new and improved headpiece at top of page). I checked out the links I mentioned above first of all for help. The flowers in those tutorials are absolutely gorgeous, but I was looking for something with more of a clustered, pom-pom like construction. Something I didn't have to piece together a petal at a time. So I started messing around and came up with the following fairly quick method.

You'll need thick crepe paper, hot glue gun and sticks, a ruler, scissors and string (string is non-essential).


Going with the grain of the paper, cut a strip of paper the length of the roll. The width of the strip depends on how big a flower you want to end up with. I started with a strip about 3 1/2" wide (it will be for the largest petals) and ended up with the flowers pictured at the top of the page. The Carte Fini rolls have a ridge every 1 1/2" or so, so I used them as a guideline and cut a four-section-long piece of paper from the strip to make my outermost petal.


Fold that piece in half and cut a rounded, tapered petal shape as shown below. Please note, you will stretch the paper after the flower is assembled, so do your best to keep the crepe crepe-y while you're working.


Cut two more sections out of that initial strip, stepping down the lengths a half a "section" each time, so that each folded petal is slightly smaller than the last. Fold these halfway and cut rounded petal shapes from them.


Cut new strips as needed from the roll, always with the grain, and reduce the width and length of the folded petal pieces gradually, until you have a collection of (unfolded) petals like this.


Start assembling the flower by applying hot glue to the bottom center and folding together, pinching tightly and being careful not to burn yourself! Make sure your glue gun is set on LOW! If you are using one of the ombre papers, they are only ombre on one side, so I faced the ombre sides inward as I glued the petals together. When you stretch them out later you can see all the wonderful gradations in color perfectly (see photo at top).


Apply hot glue to the next largest petal, about a third way up from the fold on each side. Carefully place the center petal in, perpendicular to the new petal (see next photo).


Hopefully you understand what I mean by perpendicular, because you're going to repeat this step until you've used all of your petal pieces. Always place the center piece inside the new piece in a perpendicular orientation, so the gaps in the previous layer of paper are covered. Is this making sense? I hope so!

When your little bud has grown to the size flower you desire, add extra glue to the final petal layer, because you really want to be able to twist and squeeze and glom everything together within that last piece of paper.


After you wrap that last petal around, squeeze everything to compact the base of the flower as tight as you can, adding extra glue to secure any paper flaps around the edges.

Next is the fun part, the stretching. Starting with the outer layer of petals, stretch the crepe paper out at just the tips of the petals, using both thumbs and forefingers. I couldn't take an action shot of that step, as I was using both my thumbs and forefingers!


Keep stretching the top parts of the petals until you get all the way to the center. You should have something like this, sort of like a carnation. I dislike carnations, but this one works for me!


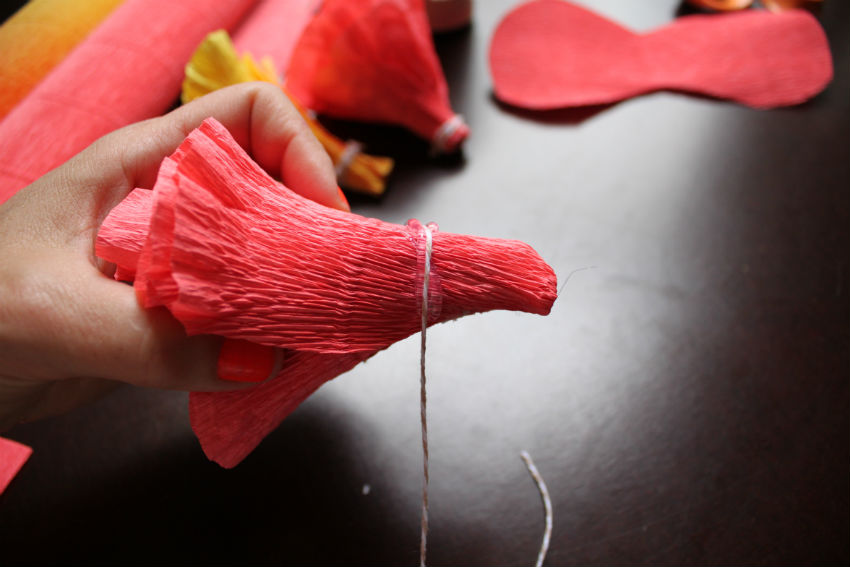
As an added layer of security I took some string and wound it tightly around the mid-base area of the flower in some hot glue, twisting it around while the glue was still warm. Then I cut off the tip of the flower. If you are adding a stem or some greenery at the outer layer of your flower, you may not need to cut off that back tip. In my case it was just getting in the way.


I love my new Frida headpiece. Before it just had a few pink roses. Now there's nothing demure about it. Perfect! I've still got all these babies to play with too, in case I feel like piling a few more on before the shows!


9.24.2012

donut pan idea. no. 12: panna cotta


Well, these were delicious. We ate almost all of them last night after dinner. David and I had them while sipping some rum, which was a great idea. He drank the bottle of rum that our friend Windy gifted me right before I became pregnant with Stella almost eight years ago, so he's forever owing me more rum.

Panna cotta in a donut pan. Simple, and the hole in the donut gives you somewhere to put, say, your roasted grapes. Or maybe a little rum-based sauce, or some other fresh fruit. You can certainly eat them alone, but they go down too fast that way.

I researched panna cotta recipes before adapting THIS recipe from Martha Stewart. I bumped up the amount of gelatin after a failed attempt ended with a wibbly mess the first time around. I really should start a blooper reel here. The deeper I get into this donut pan project, the more foreign the recipes/directions are to me, and I'm making a lot of donuts twice to get them perfect.

Feel free to use whatever panna cotta recipe you'd like. For the recipe linked above, which makes eight donut-shaped desserts, you'll need 3/4 c. plus 2 tbsp. whole milk, 1/2 c. heavy cream, 1/3 c. sugar, 1/2 vanilla bean (split lengthwise, seeds scraped and pod reserved), 1 large pinch salt, 1 3/4 tsp. powdered gelatin and 2/3 cup creme fraiche. If you choose to top with roasted grapes (another Martha Stewart recipe, from the September 2012 issue of Martha Stewart Living) you'll need.....grapes! Also, two donut pans, canola oil for greasing the pans, and a squeeze bottle if you've got one, to make filling the pans easier.


These need to sit in the refrigerator to set for at least three hours, but I recommend keeping them in there for about six. With the amount of gelatin I used in these, there is a good chance if you left them overnight they'd get a little rubbery. I'd make them the same day I was going to serve them, unless you really know your way around panna cotta!

Scrape your vanilla bean. I can't believe I've never done that before! There are tons of seeds in a half a pod. In a small saucepan over high heat, combine the cream, sugar, vanilla bean seeds and pod, salt and 3/4 c. of the milk and bring to a boil. Remove from heat and let steep for ten minutes.

This shot doesn't do the seeds justice.


While the vanilla pod and seeds are steeping, soften the 1 3/4 tsp. gelatin by sprinkling over the remaining two tbsp. milk in a medium bowl. Let sit five minutes.


Bring the milk and cream mixture back up to a full boil, then whisk a little into the gelatin until the gelatin is completely dissolved. Whisk the rest of the hot mixture in and then strain out the pod and bigger chunks of seeds through a fine sieve.


Not enough hands to photograph the straining of hot liquid!

In another medium bowl, measure in the creme fraiche first, then slowly whisk the warm mixture into the creme fraiche until all is completely smooth. Let sit, whisking occasionally, for the next half hour. Use that time to clean up your kitchen and oil your donut pans!


The connecting thread throughout all the donut projects: the greasing shot.

After a half hour has passed, whisk the mixture one more time and funnel into a squeeze bottle. It is possible to fill the pans without a squeeze bottle, but the bottle made it less messy and more fun. Fill each of the eight oiled donut pan cavities equally with the cream mixture. Refrigerate at the very minimum three, at the maximum six to seven hours.


For the roasted grapes (again, Martha Stewart's great idea, not mine), just set grapes on some foil or parchment paper and roast at 425º for about twelve minutes, until they start to pop and release some juice. Let cool.


I made the panna cotta just firm enough that you can dislodge one at a time from the pans and the others won't flop around while you're doing it. You can always give the back of the pan a (quick) dip in a warm water bath to help unmold the panna cotta, but I didn't find that was necessary. Take a knife and gently press around the edge of one panna cotta ring to break the seal. Then, turn the pan over your individual-sized serving dish, taking care to position the pan so the panna cotta will land exactly where you want it on the dish. There is no going back once it falls on the plate, you can't slide it around afterwards! Press and pull on the top surface of the panna cotta until one edge starts to come out of the pan, and the rest should follow quickly.

Repeat for each ring of panna cotta. Fill centers with toppings (grapes or the like), and serve!  


These two didn't end up on their plates as perfectly as I would've liked.

The third time was the charm. More or less dead center.

Also good with a cup of tea, by the way!


Related Posts Plugin for WordPress, Blogger...