9.07.2012

busy hands


A pink sky over all of San Francisco a few nights ago.

I'm all about two things right now, if you haven't noticed. Eggs and donuts. I'm really into both of them. Compelled to make the piƱata eggs, obsessed with the donut pan project. It feels great to be making things that people like. I sort of thrive on the nice feedback.

I have always known that the act of whatever I am making is equally as important to me as the meaning behind it. That's just the way I'm wired. When I was painting, it wasn't the subject matter that moved me so much as the getting up at 2:00 a.m. almost every single morning and brewing some coffee (back then I did single drip with a coffee filter, a rubber band and an empty glass prayer candle), smoking cigarettes and painting until it was time to shower and go to work. It was the twice-a-month 4:00 a.m. van trips to the S.F. Flower Mart with a friend of a friend to get the freshest delphiniums to draw. Thinking of that solitude in the deep depths of morning (during which I was recovering from a very sorrowful event in my life) still makes my heart palpitate. Over fourteen months of this. Was it the delphiniums? No, it was the ritual and the feeling of applying paint. They physical act of my special technique.

Detail, Delphinium I, 2000.

I've been looking for something for years and years that might feel that way again. Last year I was intensively making burlesque costumes, which was fabulous, but different. I thought I'd eventually pick up a paintbrush again. I've had plenty of opportunities and a little time to dabble, but because I can't go all-in right now it hasn't worked out.

The eggs and donuts have, though. And they are done in a day usually, giving me almost instant gratification. That's what I have time for these days.

But now I'm behind here. Where are all the photos from the rest of our East Coast vacation? Where are the photos from Stella's first day of school and Oliver's third birthday? I find I'm asking myself lately what it is I want to do here. I mostly want to talk about visual things now, about what I'm making, and less about what we're doing. The problem is, this has been our family photo album and scrap book for over a year. Do I abandon this because I've found something to do with my hands? Can I reconcile the two here?

Just something I've been thinking about. Probably working its way into something I haven't even thought of yet.

I hope you have a great weekend. Thanks for listening! xoxo


9.06.2012

donut pan idea no. 16: eggs two ways


There are many, many things we can do with eggs in these donut pans. Egg ideas are the number one idea suggested to me when talking about the donut pan project with my friends. I know what you are thinking. Don't worry, we'll get to that one.

These are coddled eggs, for lack of a better term. One is coddled to a soft cook, the other to a hard. The beauty of coddling your egg is twofold. First, you are able to gage the level of doneness of your egg simply by looking at it (and maybe giving it a poke), unlike the guesswork involved with cooking an egg in its shell. Same taste, no mystery. The second wonderful thing about these ring-shaped eggs is just that. The shape. You know where your yolk is from the get-go, and getting to the yolk is the best part! Not to mention how nicely a ring would sit on a bagel. Remove the yolk completely and you've got a perfect egg white for your bagel sandwich. The shape is just fun. It's just awesome.

Soft cooked, with toast.

Hard cooked, in a deconstructed egg salad.

All you need is a large metal roasting or broiler pan, a metal baking sheet, a gas oven, cooking spray and large eggs. And whatever you want to serve your eggs with.

Start by spraying the donut pan cavities you are going to use with cooking spray. Set the donut pan in water within the larger roasting pan. The water should come up to the underside of the top of the pan, no further. When the water boils the donut pan with float around a little bit, which is good. 

Oil or spray as needed.

Donut pan in larger pan.

The larger roasting pan should span two burners, so heat is distributed evenly.

Get water to a gentle boil and keep it there.

Things at this point are hot and steamy. Break one egg into a small container (preferably with a spout) and then pour into an oiled pan cavity, being careful not to break the yolk. Work quickly (and with caution)! The soft cooked eggs can be ready within 3-5 minutes, the hard cooked around 8-10. Again, the beauty of this is you can watch the eggs, not just the clock.

One at a time!

They start to set up fast!

Keep the donut hole clear if needed.

If you partially cover the roasting pan with a baking sheet, things will go even quicker.

When the cover comes off, things get extra steamy. Please be careful!

Here's the soft cooked egg. I lifted it out of the pan with a
knife and slid it onto a plate. And ate it with toast.

The hard cooked egg stays in a few more minutes. One of the neat things about this method is you get no unsightly gray coloring around the hard yolk. When you think the egg ring is cooked to your liking, remove the pan from heat. To prevent further cooking, slide it out of the pan onto a plate as soon as you can.

Toothpick test.

Super steamy!

By the way, dicing a donut-shaped hard cooked egg is way easier than dicing an egg-shaped egg.

I actually served the hard cooked egg to David at dinnertime, with some dill, diced red onion, mayonnaise and cracked pepper. He devoured it. This weekend I plan on making our breakfast sandwiches this way. Just for fun.


9.03.2012

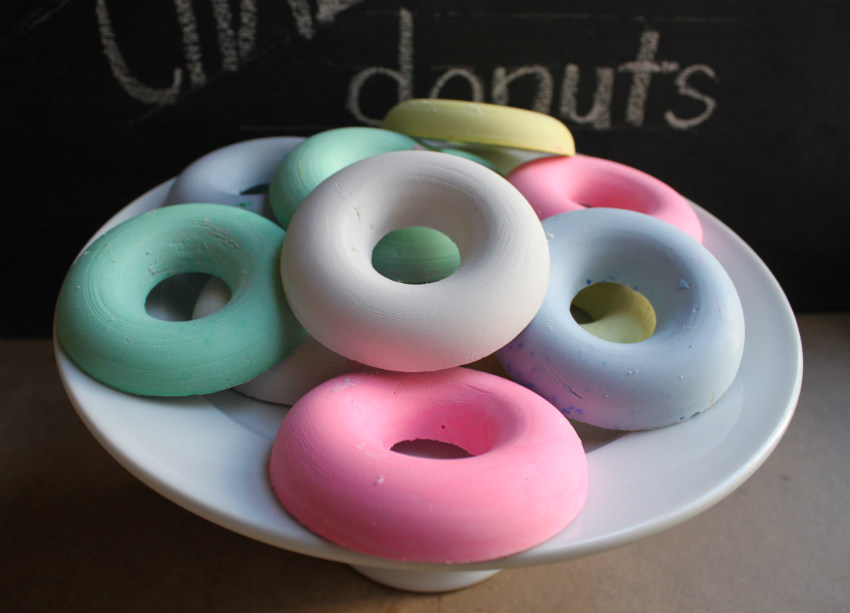
donut-shaped chalk


Why would I do this to myself? Why would I experiment all day long, setting dozens of pans of chalk donuts, one set failing after the next? Why would I subject myself to even more criticism after the mixed reviews of my donut-shaped crayons earlier this year at Apartment Therapy?


Because look at them. They are gorgeous. They are interesting. They look like candy! Be sure your kids don't try to eat them. Mine didn't, they just drew all over the courtyard with them. Even the pile of rejects which were too wet, or too brittle or too pockmarked still make me happy and will give us chalk for a year! If it wasn't for David, who suggested I try dislodging the chalk from the donut pans by tapping the backs with a hammer, this would've been a total disaster. So, thank you David!


I adapted my chalk from this Martha Stewart recipe. You'll need the following: Plaster of Paris, tempera paint in different colors, water, cooking spray and an old plastic container you don't need anymore.

Plaster of Paris and paints.

You'll also need the aforementioned hammer, and most importantly, your "B" set of donut pans. You really can't make these in pans that you'll be cooking in. I am lucky and have a lot of pans I was given by Wilton. I'll be giving more pans away at the end of this month, but they really don't cost that much. If you're playing along, it'll be great if you get yourself a second set. I've got a lot more non-food-safe ideas coming up.

Before you start mixing up chalk, which is a relatively simple process, your pans need to be prepped. After much work, here is the pan prep that worked the best for me. You've got to get this right or you'll end up with a pile of rubble.

First, spray cooking spray into the pan cavities and sprinkle a dusting of Plaster of Paris in each one.

If left like this, they create a pocked, bubbly texture on the top of the donuts. Not the best effect.

Next, wet your hand. Using wet fingers, smudge and smear the plaster into the oily spray. The water helps create a viscous, goopy paste that is greasy and would be hard to wash off.

It takes a little work it to get the paste very thin and somewhat streak free.

Spread the paste as evenly, thinly (but thoroughly) and streak-free as you can on the cavity walls and up the middle. When you are done with that, run the pan under cold water and just tap it once to shake out, so some water remains in the pan.

The water will bead up, but just a few drops in each cavity will help the chalk release later.

Now the fun part. I mixed enough to make three donuts in each color (hot pink, light blue, light yellow, light green and white). It is important to first be sure to dissolve the paint completely in the water to insure no rogue clumps of color remain in the chalk.

For three donuts, dissolve 2-4 tbsp. tempera paint in 1/2 c. cold water. Add to 3/4 c. Plaster of Paris in a plastic container and mix with rubber spatula for 1-2 minutes until smooth and no clumps of pigment remain.

Dissolve paint in water first!

Combine with Plaster of Paris.

Pour into prepared pans. I'd already mixed and poured white donuts in this pan.
Rap pan evenly on counter to release air bubbles and settle the plaster.

Repeat with other colors as desired. It honestly only took a minute to rinse the bucket and
start again with a new color, so don't be intimidated. It goes quicker than you'd think.

When finished, let chalk set up for one or two hours. It is still going to be moist, but it will be hard.

Then the nerve-wracking part: releasing the donuts. Nerve-wracking for me, but luckily for you, two dozen broken donuts later, I've got this worked out. I tried everything to get the donuts out in one piece but was having no luck. Then David suggested trying gently tapping the backs of the individual donuts (as opposed to my extremely loud thwacking of the entire pan on the counter). It worked! I also soaked the bottoms of the pans in a tray of hot water for a minute to try to get the grease moving, but I think the tapping alone does the job.

Just a minute in a tray of hot water, just in case that helps.

With the pan inverted flat on a kitchen towel, hold securely and give firm but
gentle raps with a hammer just a few times around the back of each donut.

Most of the time you're going to get lucky and get this!

 Let dry on a rack for 24 hours. Aren't they pretty?

So fun!

Well, that was an arduous journey for me, in my little ol' test kitchen, but hopefully you can have some fun with these. Like most of these donut ideas, I think these would make a really special gift!


Related Posts Plugin for WordPress, Blogger...