

Why would I do this to myself? Why would I experiment all day long, setting dozens of pans of chalk donuts, one set failing after the next? Why would I subject myself to even more criticism after the mixed reviews of my donut-shaped crayons earlier this year at Apartment Therapy?


Plaster of Paris and paints.

Before you start mixing up chalk, which is a relatively simple process, your pans need to be prepped. After much work, here is the pan prep that worked the best for me. You've got to get this right or you'll end up with a pile of rubble.
First, spray cooking spray into the pan cavities and sprinkle a dusting of Plaster of Paris in each one.
If left like this, they create a pocked, bubbly texture on the top of the donuts. Not the best effect.

Next, wet your hand. Using wet fingers, smudge and smear the plaster into the oily spray. The water helps create a viscous, goopy paste that is greasy and would be hard to wash off.
It takes a little work it to get the paste very thin and somewhat streak free.

Spread the paste as evenly, thinly (but thoroughly) and streak-free as you can on the cavity walls and up the middle. When you are done with that, run the pan under cold water and just tap it once to shake out, so some water remains in the pan.
The water will bead up, but just a few drops in each cavity will help the chalk release later.

Now the fun part. I mixed enough to make three donuts in each color (hot pink, light blue, light yellow, light green and white). It is important to first be sure to dissolve the paint completely in the water to insure no rogue clumps of color remain in the chalk.
For three donuts, dissolve 2-4 tbsp. tempera paint in 1/2 c. cold water. Add to 3/4 c. Plaster of Paris in a plastic container and mix with rubber spatula for 1-2 minutes until smooth and no clumps of pigment remain.
Dissolve paint in water first!

Combine with Plaster of Paris.

Pour into prepared pans. I'd already mixed and poured white donuts in this pan.
Rap pan evenly on counter to release air bubbles and settle the plaster.

Repeat with other colors as desired. It honestly only took a minute to rinse the bucket and
start again with a new color, so don't be intimidated. It goes quicker than you'd think.

When finished, let chalk set up for one or two hours. It is still going to be moist, but it will be hard.

Then the nerve-wracking part: releasing the donuts. Nerve-wracking for me, but luckily for you, two dozen broken donuts later, I've got this worked out. I tried everything to get the donuts out in one piece but was having no luck. Then David suggested trying gently tapping the backs of the individual donuts (as opposed to my extremely loud thwacking of the entire pan on the counter). It worked! I also soaked the bottoms of the pans in a tray of hot water for a minute to try to get the grease moving, but I think the tapping alone does the job.
Just a minute in a tray of hot water, just in case that helps.

With the pan inverted flat on a kitchen towel, hold securely and give firm but
gentle raps with a hammer just a few times around the back of each donut.

Most of the time you're going to get lucky and get this!

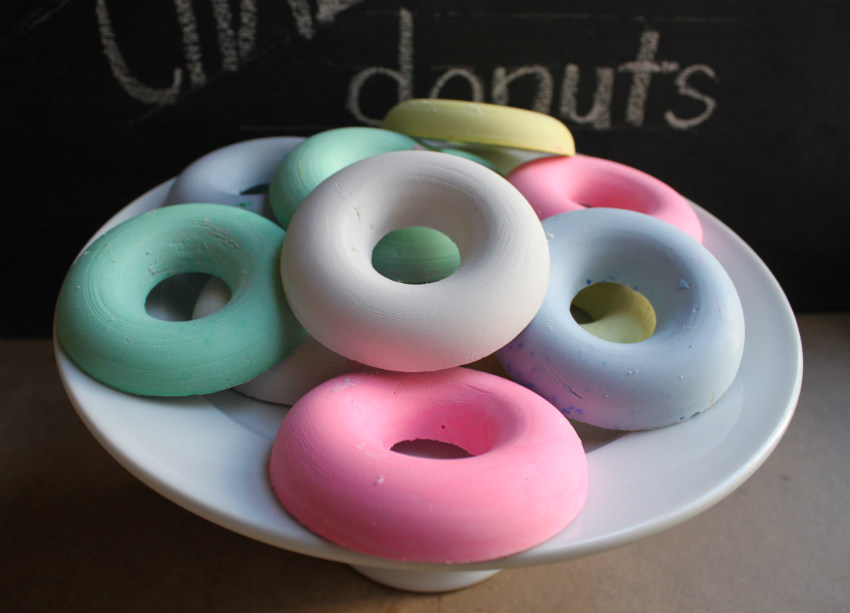
Let dry on a rack for 24 hours. Aren't they pretty?

So fun!

Well, that was an arduous journey for me, in my little ol' test kitchen, but hopefully you can have some fun with these. Like most of these donut ideas, I think these would make a really special gift!


Looks like fun! And definitely eye candy .. (:
ReplyDeleteLT! Thank you! I was just headed over to do some reading at your blog! xo
DeleteSo much fun! I just love the hammer shot irrationally much.
ReplyDeleteThis post would not be here, if not for that beloved hammer! xo
DeleteCan you say Hanukkah?? :) these are so pretty!
ReplyDeleteThank you, Beth! We used them all already, but I can make more! :)
DeleteYour photos are crazy good! How many is that now?!
ReplyDeleteThanks, Ann! This one makes 15, but I posted the 16th one just now. I'm going to try to do two a week for a while, I'm so into it, and 101 is a long way away! xo
Deletethey look good enough to eat... :)
ReplyDeleteThank you! I know who you are, EZ! xo
DeleteThese are shockingly attractive. They make me think you could make candy in the donut pans, then make huge candy necklaces, like an early hip-hop version of the usual ones. Also, I'm sorry I spelled your name wrong in my last comment. Thanks, Tiffanie!
ReplyDeleteThank you so much, Rhea. That's the way I feel about every single thing that comes out of those pans. There is probably some amazing universal, inborn attraction we have to the donut shape. We have been brainstorming lots of practical candy ideas, I like this idea of actually purposefully oversizing things. I'll let that one simmer. Thank you! :)
Delete